But as promised, I wanted to share with you all how the satin-black bathroom came out! I know that using black paint on walls can sound a bit scary, but if done right it can actually look very classic and beautiful.
So this room actually became black on a whim. Little backstory... I had painted the adjoining guest bedroom a pretty neutral gray (Edgecomb Gray by Benjamin Moore) shortly after we moved in. I LOVE that color. Since I had almost a half gallon of it left, I figured I would paint the bathroom that color as well.
Here's a little shot of it in the guest bedroom...
Until I remembered it was a "flat" finish. Which isn't the best formula for a bathroom. For bathrooms, I like to use at least an eggshell formula. Preferably a satin. Just because hairspray, products, any moisture basically, will stain the walls and be almost impossible to clean. The finish basically soaks it right in. So a satin (or glossier) formula will be easiest to clean and hold up so much better.
So I went into the garage to see what leftover paint we had in a satin formula.
Remember these??
To see more on painting the French doors in our foyer black, check out this post.
Yep. An almost full can of Behr Black Suede in a satin finish. I had purchased the full gallon of this (although the French doors took maybe about 1/8 of it to paint?) thinking I may use it on the back of the front door as well, which I'm still thinking about.
Anyway, I immediately got really excited about the idea of a chic little black bathroom.
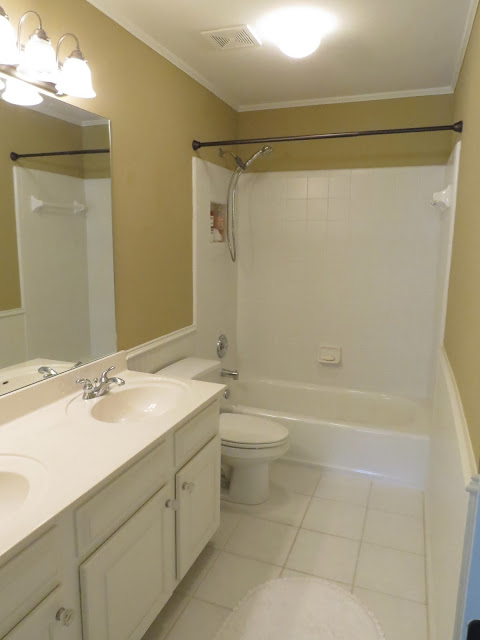
Here is the before shot...
When we moved in to this house a few months back, you may remember me talking about how excited we were about how updated everything was. Every faucet, fixture, cabinet knob, countertop, doorknobs, floors, granite... everything had been replaced brand new before we moved in. Except this bathroom...
It was like the poor little bathroom that everyone forgot. In these before photos, you may be able to tell I had replaced the cabinet knobs with some of my Anthropologie crystal pretties I brought from our last house. Yeah, all new cabinet knobs everywhere too. Just not in here. I seriously think they just forgot about it.
So my plan was to work with what I had in here.
The paint color before was totally not unbearable, but it was very yellow in this room. Also, you cannot tell at all from the photos, but the paint was peeling off and flaking in a lot of areas in here. I'm guessing there was wallpaper in here before and when it had been removed, maybe there was some residue left over that they painted over? Totally not sure.
Here's a few more before shots.
This bathroom is meant to be shared between the two bedrooms at the end of the hall. The guest bedroom actually connects, while the other bedroom doesn't. It's right next to the doorway to the bathroom though. I cannot wait to share that room with you guys. It's HUGE. We're thinking that will be a perfect room for a future kiddo. Don't get excited. Not that time quite yet...haha
So I began by sanding over the walls where the paint was flaking and where it appeared the residue (possible old wallpaper glue?) had broken through. That was the worst step.
Then I "cut in" with the black paint and an angled brush around all of the trim, crown moulding, and doors. I take back what I said before. THAT was actually the worst step... and by far the most time-consuming.
Then I rolled the paint between all of that on the walls. That went super quickly.
aaaand here she is!
I think the white bead board trim and all of the white cabinets, floors, and tile in the shower helped to balance out the black.
Not the best shot below (the lights are reflecting all crazy on the walls), but you can see the other little side of the sink and you can see how I painted the little wall "medicine cabinet" black as well. I thought it just looked a little more pulled-together rather than leaving it white.
Speaking of the light fixture, this thing gave us some MAJOR problems. I actually like the way the chrome faucets and finishes in the shower look with the black paint, so I decided to make those work and just pick up a new pretty vanity light fixture to replace the brushed nickel finished one. So off I went to Lowes and bought a shiny new chrome one.
Brad is great at electrical stuff and replacing fixtures and whatnot, so we came home and removed the old one... Only to find a HUGE hole right behind the two left lights exposing a large plumbing pipe behind it. Apparently when the house was built, they did that to sort of make you avoid drilling any part of the fixture through it. Which is great because the existing fixture would have been mounted and drilled to the wall right at that spot (they drilled a new mounting hole in the mounting plate to avoid it. I should've totally taken a photo of it... It was crazy.
Problem was the new fixture attached in the center and didn't have that huge backplate like the existing one. So we would have had to patch that spot which would have been a tough job.
So up the old fixture went again and the new one went right back to the store. I picked up some of the same little clear shades I used in our powder room re-do too. I think they look a lot better.
The only thing I would eventually like to change is possibly the countertops. I'd like to change them to a light-colored granite. Just because the ones now are pretty scratched and can look a bit yellow against all of the white, but they're just fine for now!
I was also contemplating painting the bead board and trim above it black too, sort of like this photo. But so far, I'm diggin' the contrast.
Not the best photo (took all of these pretty late at night), but here's what it looks like coming in from the guest bedroom side.
One thing I would LOVE to do that will definitely happen in the future is to replace the little light fixture in front of the shower. You can see it in the photo below (should have totally turned it off for this pic, but you get the idea).
It's nice because it's controlled separately than the light above the vanity. Anyway, I'd love to change it out to something really fun. Definitely will wait until I find something perfect.
So my biggest tip with black paint (where walls are concerned) is to stay away from stark black formulas. Even if you want a black black room. It's usually just not flattering. Find a black that has a bit of gray or brown mixed in to soften it a bit. It will still read very black, but won't look stark.
details:
paint: Behr Black Suede (satin formula)
sunburst mirror: Target
shower curtain: India Rose
rug: Ballard Designs
candleholder: Bath and Body Works
little mirror on vanity: Anthropologie
little gold tray on toilet: Target
bathmat (over tub): Target
crystal knobs: Anthropologie
Paint is a pretty crazy-big-difference update huh? All of the little decor items in the room aren't new. Literally the paint is the only update. I love what a difference it made!
So do you guys have any black rooms? What are your favorite black paint colors for walls?


.jpeg)
.jpg)

.jpeg)


