Friday, 9 November 2012

Romantic Curls Hair Tutorial (Curling Iron)

Happy Friday lovelies!! I'm SO happy it's the weekend!
Perfect timing for this tutorial, because I'm going out tonight and definitely wearing this hairstyle.

It's actually quite easy and fast.  What makes this style different from other hair curling tutorials I've done in the past is that I used a slightly different technique and a different hair product that actually holds the curl a lot longer and makes the style look a little softer and more natural.

So you could wear it completely down if you prefer or you could do a super simple half-up look that will prolong the look even further (which I show you how to do in the video).


...I say that because, yes, I am a hair-toucher.  keeping the sides up for this look keeps me from constantly touching my hair to get it out of my face and helps the overall style last a lot longer.

Plus, I think it looks super cute and romantic. ;)

So be sure to check out the video below for a simple step-by-step tutorial on how I use a curling iron to achieve soft, romantic curls.


Tuesday, 6 November 2012

New Office REVEAL! ...Decor on a Budget

Those that know me personally know that I'm a bit compulsive when it comes to decorating. Not compulsive as in choosing strange things I regret, but compulsive as in when I get an idea in my head, I do it. In less than a day.

 So in less than 24 hours, my home office went to this...
BRIGHT AND HAPPY :)


...from this.
dark and gloomy... and purple?

The only new items? Black curtains. That's IT. The paint was found in (what my husband calls), the "paint department" in our garage and all the furniture is the same, but rearranged. The lamp was in our attic. Shop what ya got, baby.

Ok, so I know it wasn't horrible before. The main issue was that the old office didn't make me feel good, which is what decorating and interior design is all about. I originally went with the dark gray because, well, I wanted a dark gray room. Why not the office?? Looking back, I love the color, but that shade wasn't what I wanted to work within during the day, you know? It was just too dark and gloomy in there. Grays are SO tricky. To me, that one looked very purple. So instead of my chic gray office, I saw a purple mistake every single time.  So if you're ever in a gray-paint-choosing situation, make sure to take the purple/blue level into consideration and go for a more true gray.

Another issue with the old office? It was cramped. Rearranging the existing furniture in the room seriously made it feel like the space has tripled. It's insane. Don't get me wrong, I love a floating desk, but I like open space more.
Check out all the rolling around space! ...for Waylon I mean. It goes back several more feet to the opposite wall beyond the edge of the photo.


 This is the only "stark" white room in our home, but it works. Don't think white is easy or boring. It actually takes more to make white work. My decor style usually is more neutral walls (warm grays or taupe) and accessorizing with color.  Color for the sake of color is no bueno. You've got to have your own style and do what makes you feel good in your own home, always.

Anyway, this white is Vanilla Milkshake by Benjamin Moore in a semi-gloss finish, which I would usually avoid for walls. I always go with eggshell. But this works! Is it bad that when we moved in I forgot what exactly I even had this paint mixed for?? It's almost iridescent. The existing mini chandelier light fixture casts a mega glamorous glow against the finish.


The biggest change other than the color is the furniture arrangement. I took my existing 3-piece book shelves/cabinet from the Ikea Hemnes line and divided those babies. I replaced the glass center cabinet with my Ikea Liatorp desk. I love the look of these three pieces together.

(the little striped pillow was a lucky Target clearance find, for $5!)
On the opposite wall, which in the original office was furniture-free, is now home to the center cabinet. I keep a lot of office/craft supplies in this big guy, as well as some cutesy trinkets and assorted tchotchkes. :)


Bookshelf styling is my favorite. In the open shelves surrounding the desk, my favorite books, photo boxes, framed photos, and pretty knickknacks hang out.


The chair above is a random dining chair I picked up from Pier 1 on clearance a while back. The pillow is from Target and my little inspiration pin board was a super cheap-o find from Hobby Lobby that I covered with fabric. Super easy way to update a plain cork board, by the way.

Some more bookshelf styling...


 gold urchin: Nate Berkus for Target (moved from our family room), black vase: clearance find from Target (only $5!) ... and also moved from our family room. When you redecorate, shop your house and use what ya got!

The desk itself is super fun because before, I didn't keep much on the desktop.  I love that now, I can add more to it without looking cluttered since it's against the wall.

mirror: Home Decorators, mirrored tray: Target, jeweled calculator & Paris sign: Z. Gallerie, gold frame: Target, lamp shade: Target, lamp: (really old) from Home Goods


chevron print cups: Mikasa (from my matching dish set) 
Again, use what ya got!

I replaced the boring knobs on the desk with these that used to be in a bathroom! I luckily had a whole drawer full of them. I believe they were originally from Anthropologie.

My light gray tufted chair I'm using at the desk was another lucky find from the Frontgate Outlet. It's super comfortable at the desk and just the right height.


The 95-inch curtains were an awesome find at Target. They were the ONLY thing I bought specifically for this office re-do. A huge tip for cheaper panel curtains... You can easily make them look super expensive by adding some clip rings to the back side of the top and hanging them that way. Makes the fabric hang nicer rather than using the pre-sewn pole pocket at the top which never looks good. I chose an antiqued brass (which I had in a bag in our attic, leftover from our old place), to go with the gold/brass accents in the room.


So that's it guys! I hope you like it. I am in LOOOOVE with it. It feels so good to be blogging from a place I feel good in and really love. That's all that matters in interior design.... what makes YOU feel good and what you love.  It's all about what speaks to you.
So if something isn't quite right in a room in your home, don't spend a ton to re-do it! Use what you've got and be a little creative. You can get a dramatic result on a budget using stuff you already have and doing a quick furniture switch-a-roo. ;)


Would you guys eventually like to see a video tour on my vlog channel when it's completely done?
Have you guys re-decorated lately??


Sunday, 4 November 2012

My Top 20 Nail Polish Favorites

I have a huge nail polish collection. So the idea of choosing 20 favorites was a difficult thought. Surprisingly, when I actually started choosing my stand-out shades, it wasn't as hard as I had imagined.
It's actually pretty funny how it turned out. I hadn't really planned on choosing specific favorites from certain color families, but naturally, my selections included a wide range of shades.
From the most conservative, classic shades to super crazy glitter and bold colors, all of my all-time favorites are represented in one place!  Kind of exciting.
I just really love nail polish...
So be sure to check out my video for all the nail polish eye candy and a list of all my top picks below.


Essie Damsel in a Dress
Essie Fiji
Dior Beige Safari
Essie Licorice
Orly Dayglow
Essie Mink Muffs
Butter London Yummy Mummy
China Glaze Bermuda Breakaway
Butter London Lady Muck 
Butter London Marrow
Butter London Primrose Hill Picnic
Zoya Vanessa
Orly Cotton Candy
Orly Lemonade 
Essie Going Incognito

Sally Hansen Salon Effects Nail Decals

Glitters:
Deborah Lippmann Candy Shop
Deborah Lippmann Across the Universe
Sally Hansen Gem Crush Big Money
Sally Hansen Gem Crush Glitz Gal
Sephora by OPI Only Gold for Me

Seche Vite Topcoat


Wednesday, 31 October 2012

Outfits of the Week - Collective OOTD's (10/24-30, 2012)

Better name than last week, huh? ;)

So I kicked off my weekly OOTD series with last week's "dumpy" post (to see all of my OOTD posts in the future, you can always click "OOTD" in the "Labels" section in the right-hand sidebar). :)

This past week I didn't really take too many OOTD photos, but here's what I got!


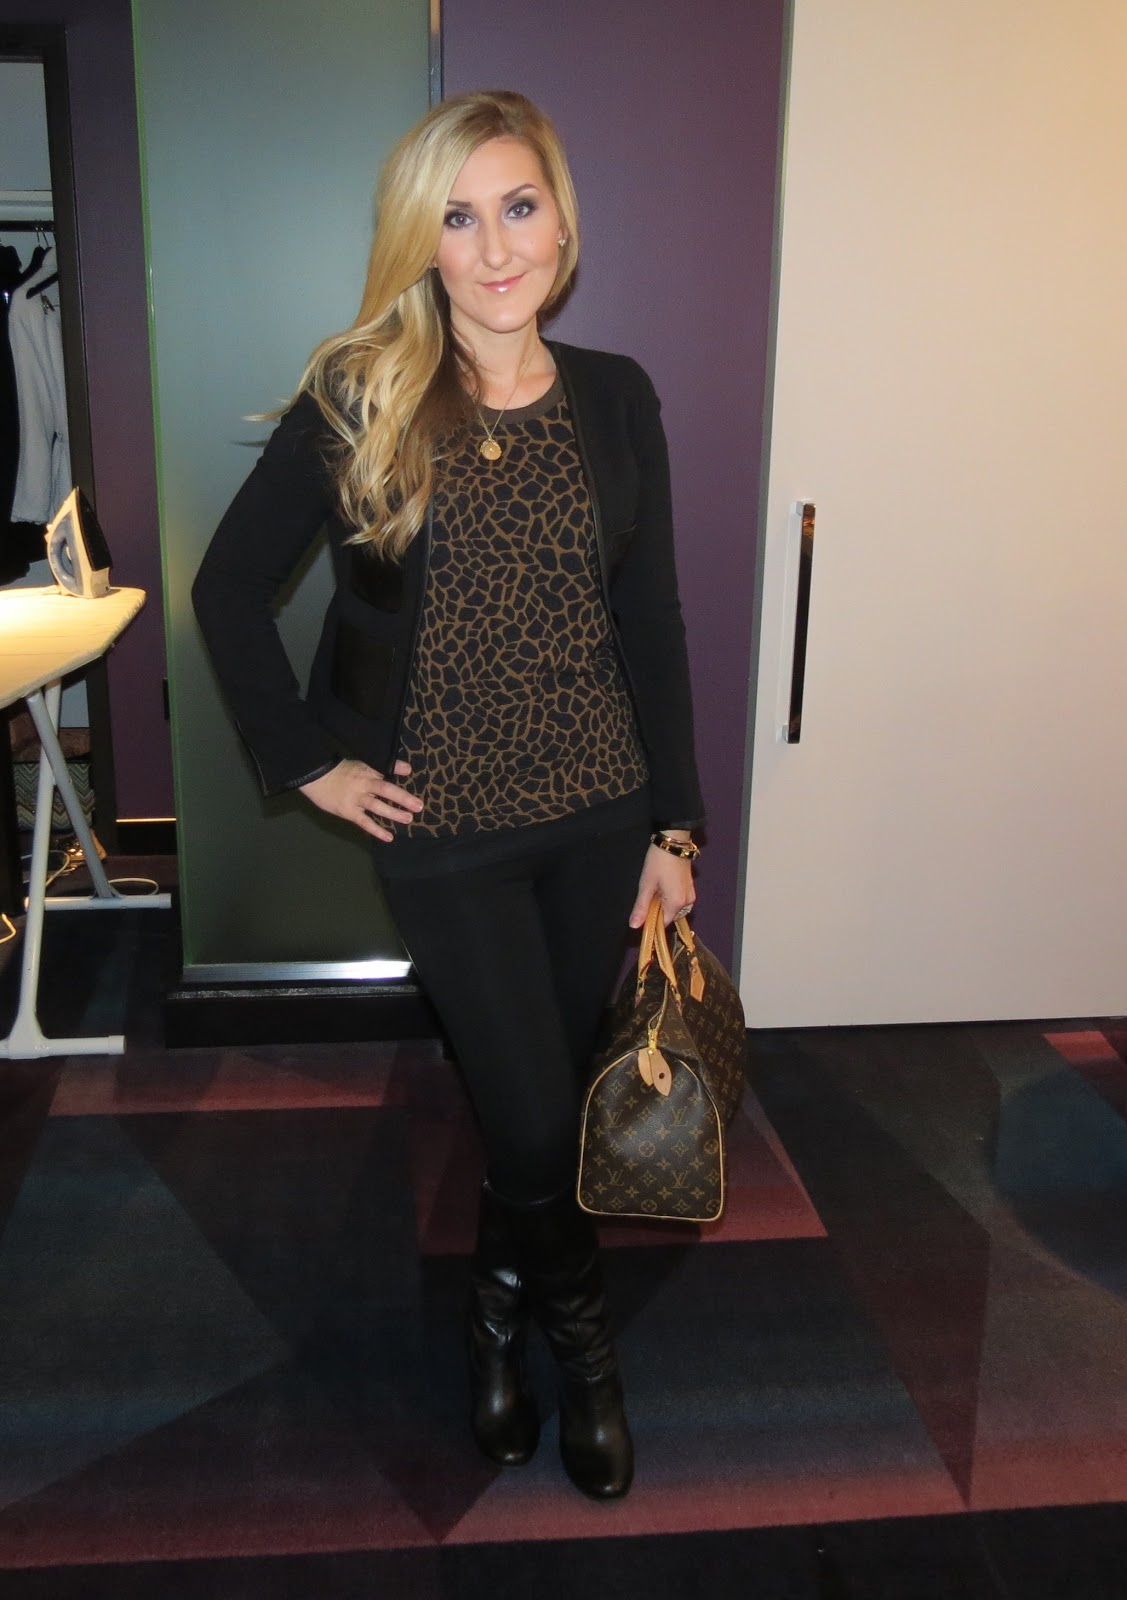
Heading out to dinner in Minneapolis.
...and yes, I iron when I'm out of town. I travel with a husband ;) 
 Club Monaco jacket, Madewell top, 7 For All Mankind leggings, Aldo boots, Club Monaco locket, Henri Bendel studded bangle, Louis Vuitton bag
{This is basically the only outfit I got good quality photos of this week. The rest are Instagram lovelies... ;) }


 Heading to my Meet&Greet/Defining Eyes Pre-Launch event at the Mall of America
 ...I really liked my top ;)
Club Monaco Top, Club Monaco faux leather panel leggings, YSL pumps, Henri Bendel/thecurrentcustom.com bracelets, Henri Bendel ring


Heading to the airport in Minnesota, traveling home.
 Sabine faux fur vest, LNA top, 7 For All Mankind skinny jeans, Aldo boots, Louis Vuitton, Tom Ford "Racquel" sunglasses

Heading to lunch last week...
 Kirna Zabete for Target blouse, 7 For All Mankind skinny jeans, Sam Edelman wedges, Louis Vuitton


Sunday, 28 October 2012

Defining Eyes Pre-Launch Event PHOTOS & Palette FIRST LOOK!

First of all, I have to say how incredibly thankful I am to each and every one of you who took the time to come to my event at the Mall of America today. I was SO overwhelmed at how many of you were there! I seriously had the best time meeting you all and I'm SO very glad that you guys are LOVING my new Defining Eyes palette for Sigma Beauty.

Those that came today not only were able to purchase it almost a whole month early, but they got a pretty sweet discount too.
Oh, and the best part? They were the FIRST to see the inside! Before I get to all the fun event photos, do you guys want a peek?? ;)


WOOOHOOOO!! Here it is. Here's a better shot.

kit contains double ended brush, 8 eye shadows, 2 gel liners, and a double-ended eye pencil
The palette contains all the essentials for defining your eyes. Everything you need for the best liner and shadow tricks and techniques... All in one kit.  It also comes with a booklet showing 5 of my favorite techniques I use this palette for.
Here's a sneak peek of those below. These were part of the slideshow that played on the huge screen during the event...


Just realized we didn't get a photo of the fifth... Oh well, you'll have to get the palette to see!! haha, I'm terrible, I know. But seriously I'm just so excited about this palette I don't know what to do.
This baby has been in the works for about a year. Getting everything just right takes time!  Can you imagine how hard it was to keep this secret? The waiting almost killed me!

I created this palette especially for you all and seeing your reactions to it today for the first time IN PERSON was SO wonderful.

Right now, the OFFICIAL release date is set for November 26th. It will be available online to everyone at that date. I'm sure I'll have some sort of special offer for you guys during that time so no worries! I'll keep you in-the-know. ;)

Oh, and I'll be posting a detailed swatch post on the palette with all the details closer to the release date, so don't miss that!

Here are some photos Brad took at the event. Oh, speaking of... He had a great time too. ;)

I'll do another post soon when I get the pro photos from the event as well.  I wish I could post photos with everyone from today, but look out for the pro pics post soon. You could be in those too!


These girls were FIRST in line at the event :)

Cute hair bow, girl.


OH and how exciting is it that soon, you'll be able to get my Defining Eyes palette IN STORE at the Mall of America in the FIRST Sigma Beauty retail location? I'll share all the store details as soon as I can!


Again, everyone that came today, you guys are awesome. Seriously. One of the best days ever.  You all are amazing!

Friday, 26 October 2012

Fall Drugstore Full-Face Makeup Tutorial

Usually for a tutorial that contains ALL of a certain type of product (drugstore in this case), it can be a little difficult. You tend to reach for things you normally wouldn't and the results may not be as great as if you would have used your "normal" things.
Funny enough, for this tutorial, it wasn't hard AT ALL to use all drugstore products. Most of these products I use all the time and love anyway. The only thing I was worried about was the foundation/concealer combo which worked beautifully and is now my preferred combo over anything else.
Gotta love affordable makeup tutorials that deliver glam and gorgeous results. ;)


Products Used:
Skin MD Naturals moisturizer
Loreal Lumi Illuminating Liquid Foundation
Revlon Photo Ready stick concealer
Cover Girl TruBlend pressed powder
Maybelline Age Rewind Eraser under eye concealer
Physicians Formula Mood Boosting Bronzer/Blush in Bronze Rose
Revlon Smoky Shadow Stick in Torch
Maybelline eye shadow quad in Olive Martini
Revlon Colorstay Pen liquid liner in blackened brown
Loreal Voluminous Full Definition mascara
Revlon Brow Fantasy
Revlon Colorburst Lip Butter in creme brulee


Check out my step-by-step video tutorial for this look below.