Thursday, 30 January 2014

De-Bunking

So just a little disclaimer... This week's decor post isn't full of pretty decor finds or styling ideas. No no, none of that. This project contained a lot of heavy lifting, elbow grease, a strong hubby, and some excessive cursing...

But it does have a pretty nice before and after.

In our house we have a really nice, huge bedroom upstairs that we're planning on turning into a nursery/kid's room eventually.  It looked like this when we moved in...

This is also what you see first when you walk in.


I remember my first words to our realtor were, "That bed looks like a death trap."  Yeah, it's built (fairly) nice and all, but built-in bunks aren't my jam... I'll explain why in a moment.

Back to the room...


It has a really nice little area with another window and a built-in desk.  Which I really love because the desk is actually built really nice.  See the top of the tiny little door to the right in the photo above?? Sort of to the left of the desk? There is a matching one on the wall across from it (behind the chair) and it is finished out with lights, carpet, walls.  Just like a little play house. So those are super fun for a kid's room.

And here's a shot looking toward the other direction at the huge built-in bookshelves which we really love. Totally looks fine in the photo (from a distance), but the whole thing needs some caulk in certain areas, some trim that isn't complete, and a fresh coat of paint.  Pay no attention to the "decor" on the shelf. This room is basically where all of the unused decor in the house comes to hang out.


There are outlets built right in for a tv one day. However, I think it will make an awesome changing area for a babe. :)  And notice the little hinged "toy chests" built right in on each side. So neat.

In the photo above, the bunk is around that corner on the right. The room extends about another 5.5 feet or so around that corner. This room is kind of hard to photograph.  Oh and all the scrap wood in front of the big closet? Yeah, spoiler alert... The bed came down. ha.

So my thoughts on built-in bunks...
I think they're a great idea if you have a spare room for guests and the such.  If you do them really nicely in a way that doesn't look like they're just for kids.  However, in an actual kid's room, they're kind of a waste. First of all, if we kept this, a child couldn't actually use the bed (safely) until they were about 4. This room, although large, has no other great place for a crib or bed.

Ok so back to the bunk... The hypothetical kid starts using the bed at, let's say, 4 years old. Who's to say said kid would even like a bunk. They freaked me out as a kid, personally. Then, (best-case scenario) if the child even likes the bed, they'll definitely outgrow it at some point. It's a tiny twin bed. Not to mention, bunks are only "cool" for so long as a child...haha. So let's say 12 is the cut-off. Just seems like a waste to me.
Now, buying a bunk bed for your kids that you can move around, that makes sense. Built-ins are just pretty permanent.

We had planned on getting brave and removing this thing for a while now but we've just kept putting it off. We were afraid mostly of the hole that would be left in the ground where the support comes down (What the heck would even be under there?), and the two main pieces of wood that connected the whole thing to the wall along the head of the bed and the side, which was secured with about 30 scary-looking bolts. I was nervous about the condition that would leave the walls.

So one night I decided to start the "demo".  I was pretty excited to get rid of this thing that had become a storage area for reject throw pillows and the such.

Obviously...


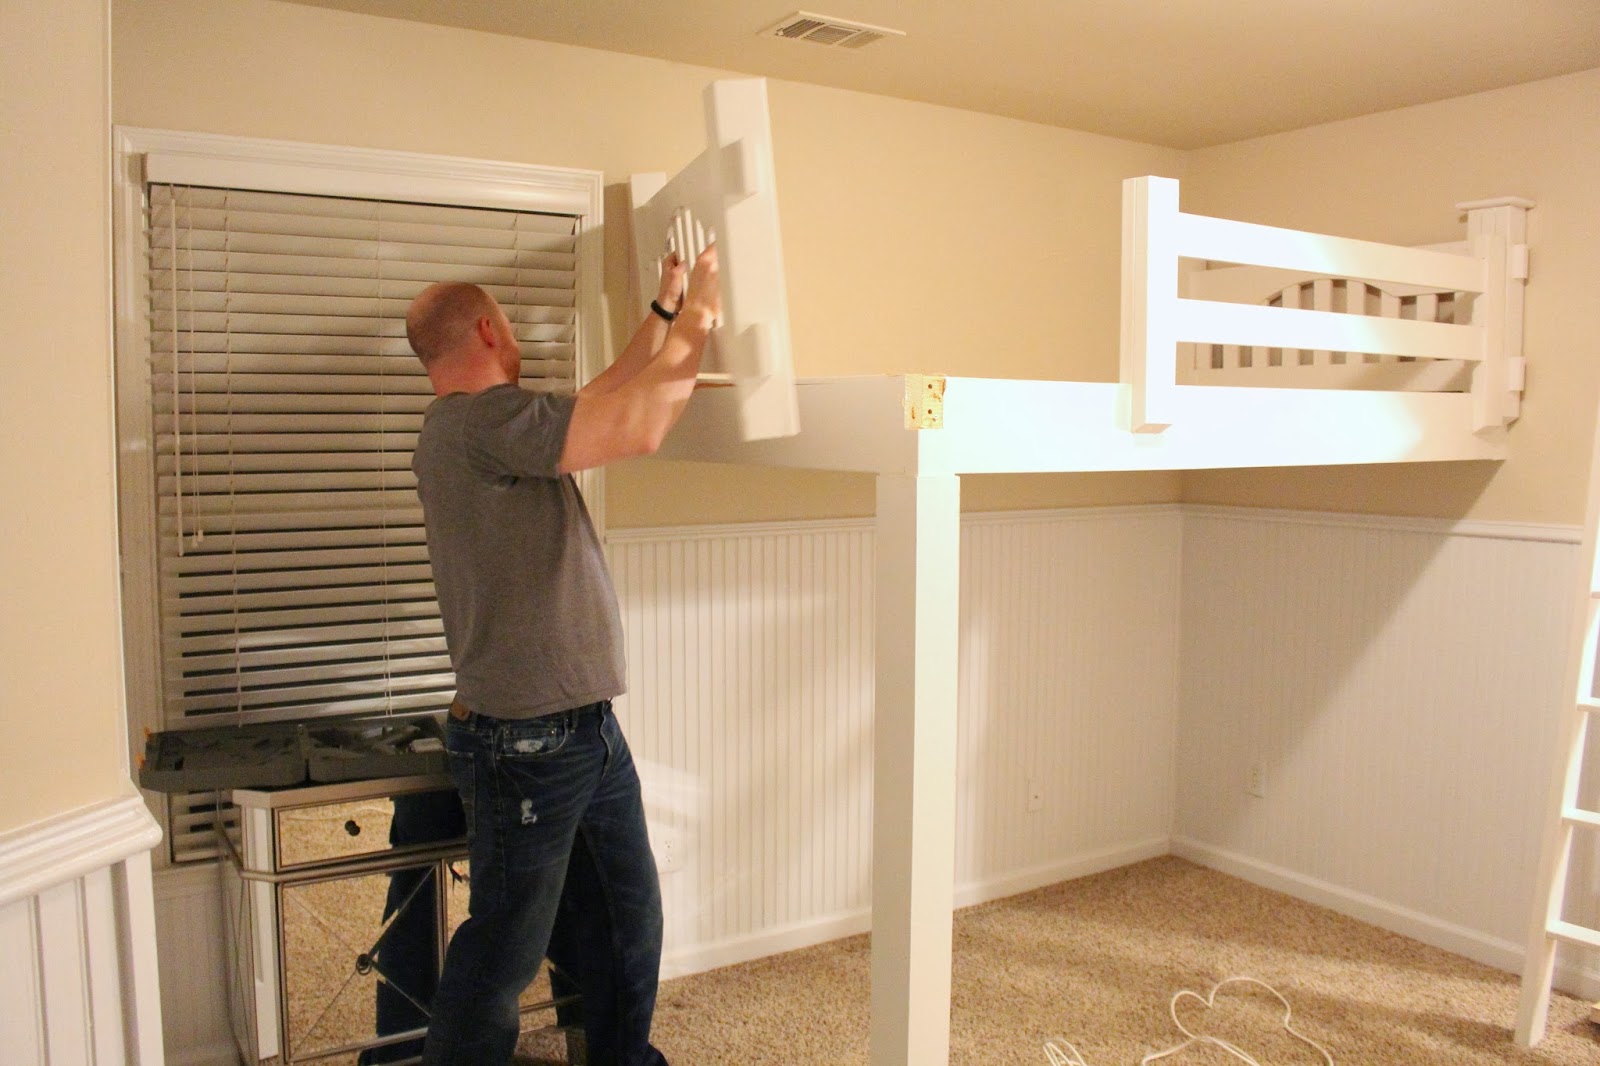
lol. We're dorks.  But seriously, all the screws were insane. I climbed up in the bed, as you can embarrassingly see above, and started unscrewing anything I could see that attached the rails.  We didn't want to just tear into the thing because we wanted to keep our home and walls somewhat in tact. Brad was afraid to climb up in there for any extended period of time because, well, he's a man and he's bigger than me.
Then I removed the ladder...


Haha. Check out all that progress...

At this point we realized we needed a pry-bar for... prying... and so we made a run to Lowes and continued the job.
I should say, Brad continued the job. It got pretty intense removing some of the pieces.  I went around removing all the screws that I could and he ripped the pieces down.


It's probably for the best that you can't hear what he was saying.
...or yelling, repeatedly.

One-by-one, the railings came down.


Not gonna lie, watching Brad rip this thing apart was really enjoyable. For many reasons. ;) Kind of a shame we don't have more things to tear down around here...

K, get your mind out of the gutter and stay on subject, Tiff...

Probably the hardest part of the whole thing was getting the large "bottom board" piece out that supports the mattress. I didn't get any photos of that because we were both struggling to get that thing free. Photos weren't exactly a top priority when we were trying to avoid crushing ourselves and sending a random piece of wood through the window.


The rest came down fairly easily...

We all know it's obviously easier to figure things out when you throw in a side-tongue.


Exhibit Q: More proof above of my tufted furniture problem... :/

The whole thing made Waylon a bit nervous with all the loud noises and giant pieces of wood being moved around. He's always had a bit of a phobia of large boxes and moving large objects.  Silly boy. But he still liked being right up in the middle of the action.


You can see what the support beam left behind in the floor.  Totally wasn't as bad as I thought. It's actually a piece of the old carpet from when the house was originally built surrounded by some wood pieces to support the beam which I unscrewed from the floor as Brad took down some other pieces from the wall. Our current carpet upstairs was put in brand new before we moved in. Not exactly what I would have chosen, but it's new and feels nice and it works.  We'd like to eventually put hardwoods in the hallways upstairs to match what we have throughout the rest of the house.  But personally, I still like carpet for bedrooms.

Back to the hole...

So I peeled it up, leaving the fresh-looking carpet pad beneath it and decided to improvise...

I cut out a piece of carpet from the floor of our tiny linen closet in our master bathroom. On the floor, we keep a basket that covers the carpet anyway. So I cut the piece I needed from the back corner. You can't see it in the closet even if you look for it.

Speaking of not being able to see it...


Can you tell where I patched the hole?? Pretty proud of that one. For now, it's just sitting in the empty spot, but I'm going to use some sort of liquid adhesive to keep it in place, rather than staples or anything that could potentially poke bare footsies.

Here's the view of the room now when you enter. Much better, huh??


Amazingly enough, the walls are in great shape! So relieved that whoever built the bed didn't use any construction adhesive or anything like that on the main beams on the walls.  I just need to spackle the holes, and cut out a few ends of the huge heavy duty anchoring screws that broke off along one wall. There are about 5 that did that as Brad removed them. My dad has a Dremel tool attachment to saw them out. So I'm waiting to get that from him until I patch everything so I can do that all at once. Then, a fresh coat of paint and we're in business.

I actually like the paint color in this room. It's the same as the color in our master bedroom. It was freshly painted when we moved in. This room was really interesting before we moved in! The bead board was dark blue and the walls and ceilings were blue and white clouds.  I can't even imagine what it was like for the painters to cover all that!  Funny thing is, I think the color they used when they repainted it is the original color used when the house was built. Can you tell behind where the beams were on the bed?? It looks SO similar. In our basement on our electrical breaker box, the original paint color sheet is taped to the inside. They said the color they used originally for this room was China Doll by Sherwin Williams. So I think since it matches so well and I know I like that color anyway, I'm going to pick up a can of that and paint only those two walls and see how it blends with the others. We'll see!

As for all the mess left behind, I was expecting a room full of scrap wood. So pleasantly surprised that this is all we have to deal with.  Haven't figured out what exactly we're going to do with it yet. It's really nice wood and it's not all busted up since we removed it nicely.  We hate to just drop it at the dump, so we're going to see if we can find someone who may want it.


Possibly the most pleasant surprise of this whole project was how pleasant it actually was. We had been building it up in our minds since we moved in that this would be a lot more difficult than it actually was. We were shocked at how quickly it came down and how the floor and walls aren't totally destroyed.

Ahhhhh... such a relief that this house is officially de-bunked.  I feel like one day, when we do have a little one on the way, it will be so nice to be able to enjoy fixing up the space and not having to do anything major like this.

This room is going to be SO fun to see come together when that time comes! For now, the goal is just to spackle/paint the walls and get it cleaned up.  I know we wont make any more big decisions for this room (lighting, etc) until we've been expecting for a bit.  Don't get excited just yet! Nothing to report. But I will of course keep you all posted as the house and everything else comes together!

Have you all tackled any projects like this before? Funny what a great stress-reliever tearing out something like this is. :)

Wednesday, 29 January 2014

A Snow Day and an Affordable Fashion Haul

Happy "hump day" y'all!

 So today I'm bringing you an extra lil' bonus video!

Before we get started, I've got to send some love to all of my fellow Atlanta folks who had the day from hell yesterday... Yeah, the snow was beautiful and magical around our house.  ...Because we were all home safe and sound.

Brad left work around 11am anticipating the madness that would inevitably ensue on the roads. However, I don't think ANYONE anticipated what was to come. Basically, we always joke that in Georgia, whenever we get a few inches of snow, the whole city and affected areas basically shut down. Mostly because we rarely get any snow and our state just isn't prepared. Also, when we see that snow is coming, it can go SO many different ways... As in, we never know exactly what we're going to get or how bad the roads will be.
The difference is that most states and areas who have regular snow in the winter know exactly what to expect and will treat their roads ahead of time anticipating the imminent inclement weather. Georgia just doesn't have those regular systems in place because it just rarely happens.

So Tuesday around lunchtime, every business started letting their employees go home. Around 1pm, most every school system in the area decided to "close" and let the children go home, which also led to even more traffic because parents were heading to pick them up. Which obviously led to MAJOR traffic issues. The streets were to capacity. Every single highway in the metro area was at a stand still. In the midst of all this, the roads were freezing.  Which meant the DOT couldn't really even GET to many of the roads to treat them because they were covered completely in record amounts of traffic. I'm talking, some of my friends were on the road for 12+ hours to travel only 5 or 6 miles. Most everyone I knew who was on the streets went on foot at some points. Babies were delivered on the side of the road, cars were abandoned everywhere, people were running out of gas...  Thousands of students spent the night on buses in freezing temperatures which absolutely broke my heart.  Hearing stories from my friends who couldn't even get to their children at their schools until midnight or so was terrible. Even people with big trucks that can usually handle the icy roads were out of luck, as most roads were just bogged down completely with un-moving traffic. Some roads looked like a scene straight out of The Walking Dead... haha. Not funny, but seriously... with all the abandoned cars, it was insane. The whole state was declared as being in a state of emergency.  Yeah it got crazy...

I could seriously go on and on about it and share a ton more stories, but you get the idea.  I'm just thankful that we were all at home safe and sound and while this one was enjoying the snow...


 ...we were so worried about the madness that was taking place all over the place nearby.


 When all the snow had fallen, we had right at three inches.


Could you just melt at that face??  Don't worry about him with the sticks. He just likes to play with them outside. We always supervise him with them because we know it's not great for them to eat pieces of wood, but he spits them out if he gets a piece off. He just thought they were extra tasty covered in snow!

K so enough of the snow madness. I'm about ready for it to melt away!

So Brad and I went to Target a few days back for some necessities and I ended up picking up some really awesome things!! I also thought I'd share some recent Macy's finds that I scored at great deals as well as the shoe find of my year...  Yeah, that statement may be a bit premature, but seriously, I don't think I'll find a deal this awesome on such cute shoes any time soon.

Hope you guys enjoy it!


Items shown...

Were any of you affected by the Georgia snow?? 


post contains affiliate links

Tuesday, 28 January 2014

red plaid love

This look is a mix of SO many things I like.  First of all, this took me back to the whole 90's "grunge" thing. Not the entire look, but my top. I remember when I was in 5th grade, my mom got me an awesome red plaid top exactly like this one. Probably to match something my older sister had.  I may or may not have completed the look with Doc Martens...


Anyway, when I put this on, it immediately took me back.

It also reminded me a bit of a lumberjack or the Brawny guy, as red plaid always does.

But most of all, the top was super soft and comfy (and affordable which is extra awesome).  Which brings me to my last favorite about this look... It's kind of an extreme mix of high and low. Which is what I love.


So I paired the more relaxed top with some "fancier" accessories... bag, shoes, and some chunky gold details.


Chanel ankle boots (similar option)
Louis Vuitton Lumineuse PM (similar option)
J. Crew cuff (similar option)


I hope you all stay warm today! We're actually getting quite a bit of snow in our neck of the woods today!!


post contains affiliate links

Monday, 27 January 2014

My TOP Makeup Brushes & Tools

Totally honest... I hadn't really thought about doing a video like this in the longest time. I guess because my makeup brushes are sort of always there and rarely changing. However, after showing you all my best makeup and beauty products of 2013 (check that out here), I thought it only appropriate to give the makeup brushes and tools some love too.

Makeup brushes and tools are just as important as the makeup... true story.  We all take such care in choosing the perfect formulas of eye shadow, foundation, liner, etc, but I've noticed that some people overlook the tools themselves which you use every single day.  For example, I see a lot of situations where people don't bat an eye at purchasing the best of the best eye shadow or foundation, but don't see the importance of investing in good tools to go with them. A good set of brushes really do all the work for you and can totally change the way your makeup looks.  Plus, if you care for them correctly, you'll have them forever.
I remember years and years ago when I first started investing in quality brushes, I was absolutely amazed. They make such a difference.

So rather than just reviewing brushes here and there or doing a video on a particular set or brand, I wanted to just keep it real and show you the brushes that are currently in my rotation. As in, on my counter.
Being used every single day.  Alllll of the ones that I reach for the most often.  My best of the best. My favorites.

So I set this one up a little different. I go through every area of makeup and show you my best type of brush that I prefer for each application.  I hope you guys find it helpful!!


(use code JAN2014 valid for 10% off your entire Sigma Beauty purchase through January 31st!)


post contains affiliate links

Friday, 24 January 2014

volumized wavy curls with a conical iron

Hair is a tricky business. A few weeks ago I had six inches cut off after I got super brave and decided it was time for a change.
Don't get me wrong, it TOTALLY was.  I was very much over the typical, curled, long and blonde moment (for now anyway). I was bored. It's so funny how hard it can be so hard to get used to styling a shorter length, even if it's not that dramatically different.  Because I wanted to embrace the more fun, mid-length look and get used to styling it with a bit more volume, I felt like a conical iron was the way to go.
Surprisingly, it wasn't that hard to get the hang of! I had never really had any experience with styling my hair with one before (other than a single failed attempt a few years ago).  I was shocked at how fast and easy it can be!

Oh, and not to mention, the crazy volume!

So this is how I create my volumized wavy curls with my new conical iron. I hope you enjoy it!


Hope this helps some of you who may be in a bit of a "hair rut" with your regular curling iron, or those struggling to learn how to get back in a "styling groove" with a fresh cut. Hope you have a wonderful weekend!!
post contains affiliate links

Thursday, 23 January 2014

Creating My Gallery Frame Hallway... & a few decor updates

This week's decor post is all about how I've gotten our upstairs "gallery hallway" started. Or "frame hallway" if you will... For now, it's just a part of a wall, but the idea is to straight-up frame-wall the heck out of the hallway over the years.


Because like I mentioned in last week's blue and white post, I like a home to feel "collected".  And also because I plan on living here foreverrrr (and our lives together are just really getting started here), you have to take collections one day at a time. If I ran out and bought 50 white frames and covered the whole hallway, I'd be all like, "ok, so what the heck am I going to do here for the next 50 years...". You know? 
So the wall/hallway project has started...

If you all have ever tried to hang a "gallery wall" before, props to you if you don't create swiss cheese out of said wall. Seriously, it can be super difficult to get all the frames hung exactly how you want, especially if you do a grid-type pattern like I did where they do actually need to line up pretty evenly.

First off, I'm the most impatient person on the planet, so when I created walls like this at our previous house, I just went for it. And created swiss cheese walls.  So I decided to give an actual "technique" a whirl. 

So I went to Pinterest and found literally over one hundred pins on this method (in some form) of hanging a frame wall by tracing the frames and hanging the paper on the walls. It's not some super unique, groundbreaking method, it's just kind of a common-sense way to do it. 
I definitely didn't follow any exact step-by-step instructions, I just got the gist of the method and went for it. 

It worked awesomely! Here's how I did it...

K, so first (well, obviously after you select where you want it to actually go on the wall), lay out your frames on the ground in the design you want.
...Actually, where it actually goes is pretty important. Think about the future. There's nothing worse than spending all that time hanging them, only to realize you've really left no options to add to it down the road. 


*Furry presh helper not absolutely necessary. But it helps.

Then, I traced my frames on some packing paper that the frames were actually wrapped in (like kraft paper, or old wrapping paper works great too).  Yeah, almost a year here and these babies were still wrapped and sitting in the floor of our bedroom exactly where they landed on moving day.

My frames are all the same size, which made this super easy because I only traced one, then stacked up all the paper and cut all at once.

Then, I simply taped them to the wall with some scotch tape in the same design I created on the floor with the actual frames. I started from the top center piece and spaced them out in a way that kept them level and separated the same amount.  I didn't use a level, just because all of my frames had only one hook in the center on the back, so leveling wasn't crucial. However, if you want to be precise, you totally can bust out the level. I eye-balled everything.


As you can see below, I started further toward the top because I plan on adding one more row of frames to the bottom eventually. I also have room on the sides too which is nice.


So I mentioned that all the frames had one center-mounted hook for hanging on the back.  Well, all except for one that for some strange reason had two hooks on the back.  These are a pain.  If you're starting a gallery wall of your own, save yourself the headache and shop for frames with one center hook on the back. So. Much. Easier.
Anyway, I have no clue why this one is different. It's the same brand and everything. So weird.  So this is a super great tip for hanging those pesky double-hooked frames that works every time.

Bust out the painter's tape.
Tape it straight across the two hooks (if you look closely, you can see them through the tape), and with something sharp, make little holes where the nail would go at the top of the hooks.


Then, pull the tape off, and put it on the wall to create a perfect guide (be sure to level this one).  So in my case, I applied it to the paper, where the hooks would hit.


Then, I just put nails at the top center of the paper (I actually spaced the nails down about an inch from the top of the paper), pull the paper off (it will rip right through the nail), and hang your frame.


Kind of couldn't believe how easy it was.

I can totally imagine that extra row on the bottom, another vertical group on each side, and some more on that wall between the doorways.


Can you see it?? I totally can. ;)

If I were going to leave it just like that, I would have spaced the whole thing down further, maybe around where the top of the door frames are. But I'm going for a different full-wall covered in frames look, not just one group.

As for what the photos actually are, they're photos we've taken of mostly landscapes of pretty places we've traveled together. With one photo of us standing in front of the Hollywood sign in the middle. Random fact about me... Photos of myself everywhere in my own home makes me nervous. I just can't. We of course have a few wedding photos, and more photos of Waylon around than I'd like to admit, but I'd rather display a few special ones of us, and frame more scenic photos I've taken.

Don't even get me started on what it will look like once we have a child. Baby photo explosion up in here. We will neeeeed all that wall space...haha.

So that's the plan! TONS of frames. I actually usually prefer black frames, but for this hallway, I'm doing white. I just like the way it's looking. These 9 white frames were actually used in our master bedroom at our last house hung in a grouping very similar to this above our dresser.

I've got lots of black frames too that are still wrapped and packed from the move as well that I'm going to create a gallery out of going down the stairs into our basement. I just like the look of sticking with similar-colored and style frames. It's more cohesive and you can actually get away with crazier groupings and adding in an odd one here and there as you collect more.

I get mine at Target, Pottery Barn, and Ikea.  They always have them (seriously, for years), so when I need new ones, I never have to worry about finding them.  Definitely don't get obsessed with thinking they all have to match exactly either.

Here are some more frame "groupings" around our home so far...

This is a pretty group of photos I took in Paris of random architecture. I grouped these fairly close together in our foyer going up the stairs so that I could add some pretty sconces on each side eventually. Or maybe even more of these frames!


These are in our powder room on the main floor of the house. More on the re-do of that space here and here. It was a doozie...


 Here are some of my favorite frames for grouping...


Also, for the sake of shoving as much decor stuff into this week's post as possible, here's a little something that ties into last week's blue and white post...

So since I changed around the foyer, my little crystal lamps I love so much were displaced. So I added them to our front living room/my office.


They sort of go with the larger one that has always been in there.

I added a few more of my blue and white vases and styled the table exactly the way it was for years at our last house. I always loved the large grouping of the blue and white vases.


  So yeah, nothing super exciting, but that's where the lamps went...haha.


oh, and a happy little reminder...
see how I created our chalkboard wall in this post


I hope you all are having a great week so far!! Any of you obsessed with gallery walls? Any great tips to share??


post contains affiliate links

Tuesday, 21 January 2014

Ulta Beauty Haul!

Last week before heading out to LA for IMATS (look for a little "photo recap" post of that whole weekend coming up soon!) I headed to Ulta to pick up a few "necessities" and ended up leaving with a full-on haul.
So check out my new video below to see all the new goodies I left with! I really found some great things.


post contains affiliate links

Saturday, 18 January 2014

IMATS OOTD, Rockstuds, and some happy balloons.


Happy Saturday, Loves!

Thought I'd drop in today with a rare weekend post to share with you all my look for IMATS.  First of all, thank you to all of you who came to my meet-up! It was amazing to meet so many of you! I really had so much fun visiting with you guys.
**Look for an IMATS "photo recap" post coming up sometime this week!

This year, I wanted a really effortless and chic look. I wanted to be comfortable.  So I put together really simple and classic pieces, while keeping the look from appearing too plain by adding in some shiny accessories and some jeans with some gold detailing.


A wedding was setting up in the courtyard nearby and these groomsmen couldn't resist getting in on the balloon action. ha.


denim: 7 For All Mankind (no longer available- similar version here)
shoes: Valentino
necklace: J. Crew
sunglasses: Tom Ford
watch: Kate Spade (similar here and here)


I hope you all are having a wonderful weekend!!


post contains affiliate links

Thursday, 16 January 2014

Easy Winged Liner Technique

Winged liner is one of the trickiest makeup techniques that people struggle with. Totally understandable! I've found over the years that there are SO many ways to do it and so many "techniques" that can actually make it more difficult than it has to be. I've found that a lot of people get caught up with having to make this perfect wing in one fluid motion. Yeah, that can be tricky.
If you've been here a while, it's no secret that I'm a fan of liquid liner and a winged look. I've tried SO many different liners and techniques and currently, this one is a winner. Sure, I'm used to "winging" liner and can do it pretty quickly with good results, but this technique is just pretty foolproof.
Not to mention, it's super long-wearing and makes your liner look SUPER dark. It's a winner in my book.

So check out my video below with a ton of tips and a tutorial for this look and simple technique. I hope it's helpful for you!


Here are the products I used for this look...


post contains affiliate links

Tuesday, 14 January 2014

My blue and white obsession...

I feel like I've been sharing a lot of "new" decor items lately. All the "newness" makes sense because we've basically been putting together and furnishing a whole new house for the past (almost) year, but today I wanted to share a specific collection of older items I've decorated with for years and give you guys some ideas about how I use them.


Blue and white...anything. Mostly where ceramics are concerned. 

It's actually a pretty traditional decor theme, however, it's been popping up all over the place lately. It's sort of genius (and incredibly easy) because you can add a few pieces into any room and instantly make it feel more collected and put-together.  
You can seriously put a blue and white piece in ANY room and it works. Seriously.

Also (and this is probably the coolest thing about it), you can sort of pull-together your ENTIRE house with a few blue and white pieces. I like every room to have it's own "feel". While rooms may feel completely different, you can throw in a bit of blue and white in different rooms and instantly make your entire house feel more cohesive.

I've been collecting mine for years and years. I started my collection about 8 or so years ago. My mom gave me a tea set and some candle sticks. To this day I cannot find those candlesticks. I have no idea what happened to them. I think between a move years and years back, I packed them up and now, well, they're gone...haha. Funny how that happens....

Anyway, I mostly have vases and ginger jars. 


I didn't realize just how many pieces I have! So I'm definitely not showing you every single blue and white thing I own (I actually have quite a bit of it put away because I don't want it to look a ceramic explosion up in here), I just want to give you some ideas and show you how I used these pieces in our home. 


See how it gives a bit of personality to my office / sitting room above? I like how this room feels light and airy, but still a little fun, feminine, and collected with different pieces I love.

Here's what I recently did in our foyer with some more of my blue and white.


I like to collect mine from antique stores. I've found some of the prettiest blue and white pieces at them. Stores like TJ Maxx and Homegoods can be awesome for finding affordable vases and ginger jars too. I prefer mine to look a bit faded and more antiqued. So sometimes, that can be a bit hard to find at TJ or Homegoods because the mass-produced ones can tend look a bit too dark and cartoon-y. But that can be pretty too! I just like to mix it up. 

So let's talk about this new round foyer table... 


Haha, ok so something new did work it's way in. I found it at an antique store, along with the two matching ginger jars beneath it.  

I had been keeping an eye out for a round table for this area of our foyer for a while now. I like the mirrored chest we had there before, but I felt like with all the white and light colors in this space, a different piece that wasn't so... reflective (especially with the mirror above it).... would look much better. 

And it does. I'm so happy with it!


I took those photos of the foyer at sunset so the lighting definitely got a bit weird for a minute there...haha.

One more recent blue and white find...


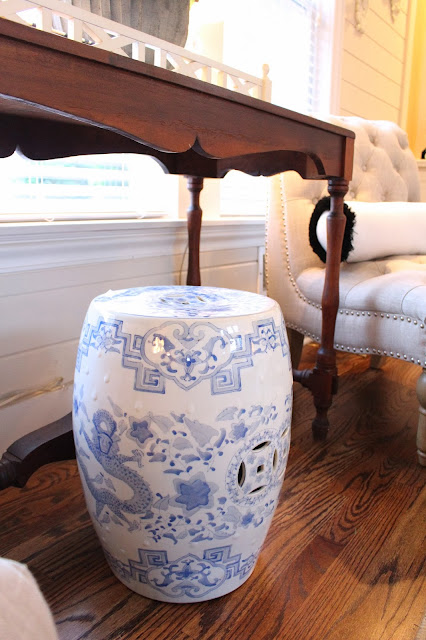
This gorgeous "garden seat".  It's huge! Super heavy and unique. It actually seems like it could be really old.  I also got it for a crazy-good price at an antique store. 


 I put it in front of my great-grandfather's "library table" (more on that here). I think it works perfectly there! It also adds a bit of (soft) color and further balances that side of the room.

Here's some more ideas from around my house!

A pretty, simple centerpiece...


 I LOVE displaying blue and white in a grouped collection... I used to actually display twice this amount (I have a lot put away) on this table below, but I like to change it up every now and then!
Oh, and they hold pink flowers beautifully!


A cute little umbrella/whatever holder in our foyer...


 Also, a tiny touch of blue and white in the kitchen...


These have flanked our sink for years. I just love these little topiaries. Adding some symmetry with blue and white is one of my favorite things to do.
It's just simple and subtle.


So like I said, check out antique stores for unique blue and white finds. If you're looking for a lot of pieces to group together and you'd like them to be somewhat similar, you can sometimes luck out at antique stores, but you may find more similar pieces at places like TJ Maxx and Homegoods. Even Pier1! I'd say to stay away from big catalog stores or specialty "catalog" stores/websites. Lots of their blue and white pieces are crazy overpriced and that's never a good look. Don't go broke starting a collection! If you love it like I do or want to start a collection of your own, make it fun! Gradually hunt for unique pieces at good prices rather than settling for every blue and white thing you find or randomly searching for and buying up a ton of it to get an insta-collection of the stuff.  Let's face it, that's no fun.

So I hope you all enjoyed this week's little home decor break! Do any of you collect blue and white too?

Oh and for more inspiration... This is one of my FAVORITE decor books. TONS of blue and white gorgeous-ness. Mine lives on my coffee table in my office. ;)


post contains affiliates